Settings tab
How to make auto-posts?
You can set how to publish your posts.
Publish Immediately – Once you click “Publish” button plugin will start pushing your update to all configured social networks. You need to wait and look at the turning circle. Some APIs are pretty slow, so you have to wait and wait and wait until all updates are posted and control released back to you.
Use WP Cron to Schedule autoposts – Will release the control immediately back to you, so you can proceed with something else and will schedules all auto-posting jobs to your WP-Cron. This is much faster and much more efficient, but it could not work if your WP-Cron is disabled or broken.
If you are using WP Cron, you can limit autoposting speed. You can define that your posts won’t be auto-posted to the same social network more often then some defined time interval. You can also set what to do if you have more posts then can be posted during the day. You can discard additional posts or schedule them for tomorrow.

User Privileges/Security
You can set what users can see the SNAP options for each post and what users can actually autopost.
Also there is an option to disable the security verification completely.

Include/Exclude WordPress Pages and Custom Post Types
You can turn on/off autoposting for WordPress pages and Custom Post Types.

Categories to Include/Exclude
Each blogpost will be autoposted to all categories selected below. All categories are selected by default. Uncheck categories that you would like NOT to auto-post by default. Assigning the uncheked category to the new blogpost will turn off auto-posting to all configured networks.

URL Shortener
Choose and configure the URL Shortener. Then you will be able to use %SURL% tag in “Message Format” to get shortened urls.

Auto-Import comments from Social Networks
Plugin will automatically grab the comments posted on Social Networks and insert them as “Comments to your post”. Plugin will check for the new comments every hour. You can set how many posts should be tracked. Setting two many will degrade your website’s performance. 10-20 posts are recommended.

URL Parameters
Force HTTPS/SSL?
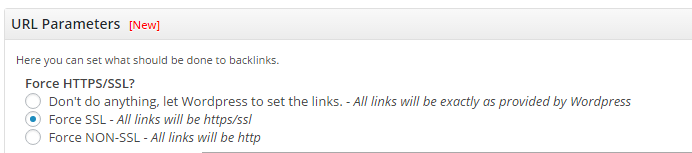
You can leave the links untouched, you can force SSL/HTTPS link or your force NON-SSL/HTTP links. This is useful if you want only secured links to me posted or if your wordpress supplies https links, but you wand regular http links.
Additional URL Parameters
You can set additional URL parameters that will be added to autoposted backlinks.
You can use %NTNAME% for social network name, %NTCODE% for social network two-letter code, %ACCNAME% for account name, %POSTID% for post ID, %POSTTITLE% for post title, %SITENAME% for website name. Any text must be URL Encoded.
Example: utm_source=%NTCODE%&utm_medium=%ACCNAME%&utm_campaign=SNAP%2Bfrom%2B%SITENAME%

Auto-HashTags Settings
Set how to generate hashtags if tag is longer then one word. What should be used instead of the space.
Set how to to separate hashtags is there is more then one hashtag.

%ANNOUNCE% tag settings
By default, plugin will take text until the tag. Please specify how many characters should it get if tag is not found.

“Open Graph” Tags
“Open Graph” tags are used for generating title, description and preview image for your Facebook and Google+ posts. This is quite simple implementation of “Open Graph” Tags. This option will only add tags needed for “Auto Posting”. If you need something more serious uncheck this and use other specialized plugins.

Advanced “Featured” Image Settings

Alternative “Featured Image” location
Plugin uses standard WordPress “Featured Image” by default. If your theme stores “Featured Image” in the custom field, please enter the name of it. Use prefix if your custom field has only partial location.

Explanation:
1. What are custom fields: http://codex.wordpress.org/Custom_Fields
If your custom field contains something like “http://www.nextscripts.com/wp-content/uploads/2014/05/h1000000.png” just enter it’s name this “Custom field name” and you are done.
2. If you custom field has something like:
Array
(
[images] => Array
(
[featured] => http://www.nextscripts.com/wp-content/uploads/2014/05/h1000000.png
[backup] => http://www.nextscripts.com/wp-content/uploads/2014/05/b200.png
[alt] => http://www.nextscripts.com/wp-content/uploads/2014/05/a30.png
)
[thumbs] => Array
(
[featured] => http://www.nextscripts.com/wp-content/uploads/2014/05/thumb-h1000000.png
[backup] => http://www.nextscripts.com/wp-content/uploads/2014/05/thumb-b200.png
[alt] => http://www.nextscripts.com/wp-content/uploads/2014/05/thumb-a30.png
)
)
Then in addition to the “Custom field name” you need to enter “[images][featured]” to the “Custom field Array Path”
3. If you custom field has something like:
Array
(
[images] => Array
(
[featured] => /2014/05/h1000000.png
[backup] => /2014/05/b200.png
[alt] => /2014/05/a30.png
)
[thumbs] => Array
(
[featured] => /2013/04/thumb-waterfall-4.jpg
[backup] => /2014/05/thumb-b200.png
[alt] => /2014/05/thumb-a30.png
)
)
Then in addition to the “Custom field name” and “Custom field Array Path” you need to enter “http://www.nextscripts.com/wp-content/uploads” to the “Custom field Image Prefix”
Examples:
1. Your featured image is stored in the custom field “MyCustImage” and this field contains the full path: http://mySuperCDN.com/a/b/c/image123.jpg
Enter MyCustImage to the “Custom field name” field.
2. Your featured image is stored in the custom field “MyCustImage” and this field contains only partial path or just image name: image123.jpg
Enter MyCustImage to the “Custom field name” field. Enter http://mySuperCDN.com/a/b/c/ to the “Custom field Image Prefix” field.
3. Your featured image is stored in the custom field “MyCustImage” and this field contains some array: [‘images’][‘imageBig’] => ‘image123.jpg’, [‘images’][‘imageMed’] => ‘image123.jpg’, …
Enter MyCustImage to the “Custom field name” field. Enter http://mySuperCDN.com/a/b/c/ to the “Custom field Image Prefix” field. Enter [‘images’][‘imageBig’] to the “Custom field Array Path” field.
** Added in version 1.0.1
** Updated in version 3.0.1
See more SNAP Features:
General and Settings
Free and Pro Plugin Features
Message Formatting Tags
Assign categories to each Social Network
Autopost of Custom Post Types
Tags/Categories posted as Hashtags
Auto-import comments from Facebook as WordPress Comments
Auto-import replies and mentions from and Twitter as WordPress Comments
URL Shorteners: bit.ly, goo.gl, YOURLS and built in WordPress URL Shortener
Additional URL Parameters
Custom URLs for AutoPosts
Export/Import Plugin settings
See direct links to the published posts from the "Edit" page
"Image" posts for Facebook, Google+, Vkontakte and Twitter
Ability to "Spin" message post templates
Choosing what image to use
Auto re-posting of the old posts