WP-Cron: Scheduling Tasks in WordPress
SNAP is using the built-in WordPress scheduling service called WP Cron for autoposts. When it set this way, all time consuming autoposting tasks are done at the background. This increases the performance and makes some advanced functionality possible. The default setup of WordPress Cron Jobs can cause duplicate autopostings, especially on popular websites.
![]()
What is Cron Job?
Cron is a UNIX directive that used for scheduling jobs to be executed at some time in the future. A cron could be used to schedule a job that is executed periodically or just once. Cron is a daemon process that runs continuously, waiting for specific times to trigger the scheduled events to occur. Windows also has a similar scheduler service.
However WP Cron is not a real “Cron Job”. Unlike regular Cron Jobs, which run at certain times or dates based on crontab (cron table) configuration file, the WP-Cron service runs every time visitor comes to the WordPress based website. This helps WordPress based websites to run properly on different kinds of server environments because it eliminates a lot of server-specific requirements. WordPress checks if there is a need for WP-Cron to run on every page load. If there is such need, then it tries to make an ajax request to the wp-cron.php file.
Issues with WP-Cron
This way of things has two potential problems.
1. WP-Cron can fail to complete all or some its jobs or it might not work at all on some environments that restrict background jobs or have short execution timeouts.
2. WP-Cron can run the same tasks several times. This is especially the case for high traffic websites or websites with specific configurations. This is what could produce duplicate posts made by SNAP.
Solution
To avoid multiple instances of WP-Cron running on your server and making duplicate posts, you can try to use the default way of setting up cron jobs on a Linux server.
Please make sure that your web host allows you to setup Linux cron jobs. The way this is setup would be different based on the control panel offered by your host.
There are two steps involeved:
1. Disable internal WP-Cron execution on page load.
2. Setup a real cron job function that makes a request to the wp-cron.php file at regular intervals based on your preference.
1. Disable internal WP-Cron function
Open the wp-config.php file in the text editor of your choice and add this to the bottom of it (just before the require_once line)
//Disable internal Wp-Cron function
define('DISABLE_WP_CRON', true);
This will stop the internal WP-Cron function from executing on every page load.
Please note:You are not disabling the WP Cron itself. You just disabling it’s execution by WordPress on every pageload and replacing it with execution by regular cronjob. cronjob will execute all WP Cron tasks.
2. Setup a real cron job
You will need to execute one the following commands by cron job
cURL (Preferable)
curl -s -H "User-Agent: Mozilla/5.0 (Windows NT 6.1; WOW64)" http://YourWebsiteURL.com/wp-cron.php?doing_wp_cron
OR
wget
wget -O /dev/null http://www.YourWebsiteURL.com/wp-cron.php?doing_wp_cron > /dev/null 2>&1
*** Replace http://www.YourWebsiteURL.com with your real website URL. This URL must be the full URL to your WordPress installation.
cPanel
To configure a real cron job, you will need access to your cPanel
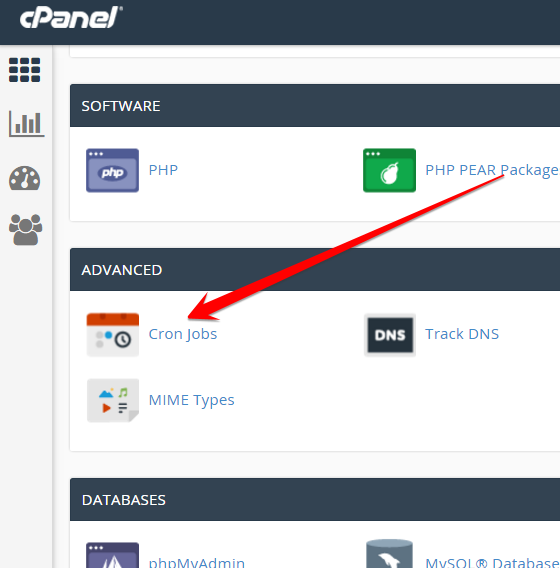
1. Log into your cPanel.
2. Scroll down the list of applications until you see the “cron jobs” link. Click on it.
3. Under the Add New Cron Job section, choose the interval that you want it to run the cron job. We recommend to set it to run every 1-5 minutes (depending on how accurately you want your posts to be). Enter the command mentioned above to the “Command” field.
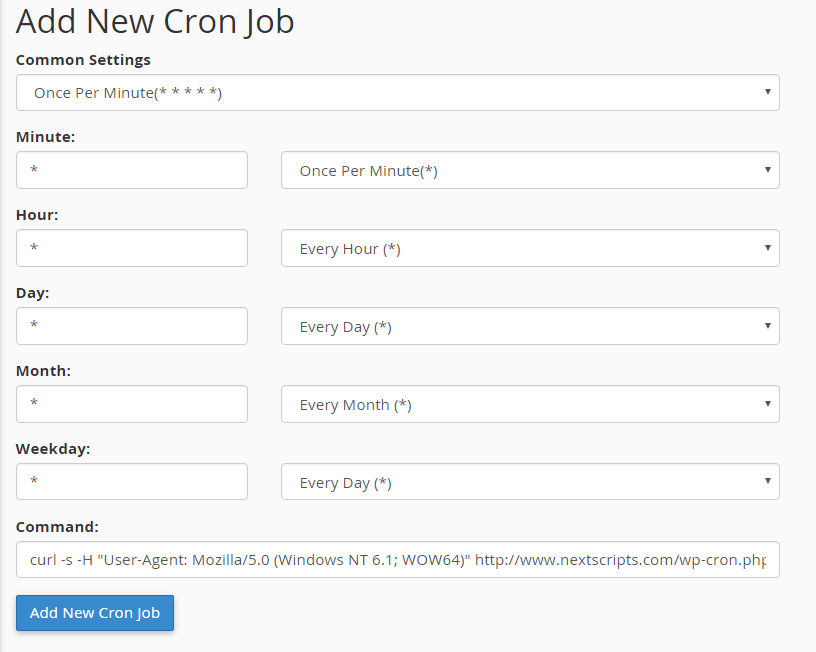
4. Click “Add new Cron Job”. You should see it in the “Current Cron Jobs” list now.

Important: If you choose WGET command, please make sure wget is not blocked!
Some configurations and overprotective plugins restrict an access of your site by wget.
The good example would be popular “Better WP Security” WordPress plugin. It adds the following line to the .htaccess file:
RewriteCond %{HTTP_USER_AGENT} ^Wget [NC,OR]
You need to remove this line, or the whole setup won’t work.
Plesk
If you are subscribed to several hosting packages and have access to several webspaces associated with your account, in the Subscription menu at the top of the screen, select the required webspace.
1. Go to the Websites & Domains tab > Scheduled Tasks (in the Advanced Operations group).
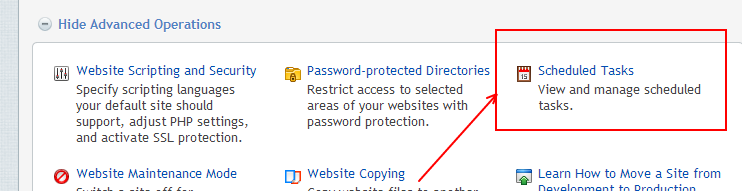
2. Click Schedule New Task.
3. Leave the Switched on checkbox selected.
4. Specify when to run your command:
Minute – enter 1 or 2 or 5 (values from 0 to 59)
Hour – enter * (values from 0 to 23)
Day of the month – enter * (values from 1 to 31)
Month – enter * (values from 1 to 12, or select the month from a drop-down box)
Day of the week – enter * (value from 0 to 6 (0 for Sunday), or select the day of the week from a menu).
5. Specify which command to run. Type it into the Command input box. You need to enter the command from above in the Command input box.
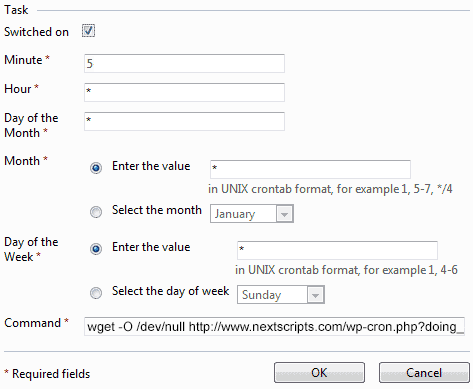
6. Click OK.
Important: Make sure wget is not blocked!
Some configurations and overprotective plugins restrict an access of your site by wget.
The good example would be popular “Better WP Security” WordPress plugin. It adds the following line to the .htaccess file:
RewriteCond %{HTTP_USER_AGENT} ^Wget [NC,OR]
You need to remove this line, or the whole setup won’t work.
External WP Cron services
Alternately (if this looks too complicated or your hosting providers does not allow cron jobs ) you can use external cron services like http://www.easycron.com/
Update: EasyCron published a special tutorial of How to Setup EasyCron for NextScritps SNAP.
SNAP Tutorials
How to deal with duplicates. WP-Cron: Scheduling Tasks in WordPressHow to check if CurlSSL is working properly